I am a recent owner of a smartphone (since August 2013), it is a relatively old one, a Samsung Galaxy S (GT-I9000), but it is still a usable and cool computer-in-a-pocket/phone.
Samsung dropped support for the phone a long time ago, but other projects picked-up and you can install various Android distributions on it. I am running CyanogenMod 10.2 (Android 4.3) and it works great.
I would anyway have done so even if Samsung would have continued support  but that could be a story for another post and another day.
Encryption has slowed down the phone
However, one month ago I decided to encrypt the phone, this was a good idea (and I would recommend anyone to use encryption on a device as mobile as phones) but it turned out to slow down excessively everything on the phone up to the point that I was barely using it. Even calling or answering the phone was a pain.
I was decided to revert the encryption without losing too much of the data/settings of the phone. Here is how I did it.
Note: the following steps worked for me, it does not necessary means it will work for anyone. I cannot be held responsible if by using this shared experience you lose any data.
Approach to revert the phone encryption
The approach is to do a full backup, restore to phone to “factory” settings (restoring the installed OS without encryption or any settings) and applying back the backup.
This approach should work on any Android version. But the instructions here are given for Android 4.x release, and for some steps are specific to CyanogenMod 10.1 and above and/or Samsung Galaxy S. If you have a different phone or Android, you will have to find the specifics by yourself (when there will be specific instructions, I will mention it either with CM10 for CyanogenMod 10.x or with SGS for Samsung Galaxy S).
Prerequisite
As mentioned in the previous chapter, these instructions could work for other phones and Android versions, but I mention here only my own setup, the one on which I successfully went through these steps.
My environment:
- A Samsung Galaxy S (GT-I9000) phone with CyanogenMod 10.2 installed;
- A computer (OS X 10.9) with ADT installed (version 20131030);
- Please make sure to install the ADT Bundle to be able to use adb.
- A micro-USB cable to connect your phone to your computer.
Backup your data
For the backup, I have used adb (Android Debug Bridge) and I have used the recovery mode to reset to factory the phone. The rest of this section contains the various steps to do the backup.
Activate the adb daemon on the phone (CM10)
This steps depends on your Android flavour, please refer to your Android phone manufacturer documentation or community project. The instructions in this section apply to CyanogenMod 10.x.
When using CyanogenMod 10.2, you need to activate the Developer Options. This is done by taping 7 times the build number field in the About section of your phone Settings. You now have a new section in your Settings dubbed Developer Options.

Under Developer Options you can tick ON USB debugging which will activate the adb daemon once you connect your phone to a computer.
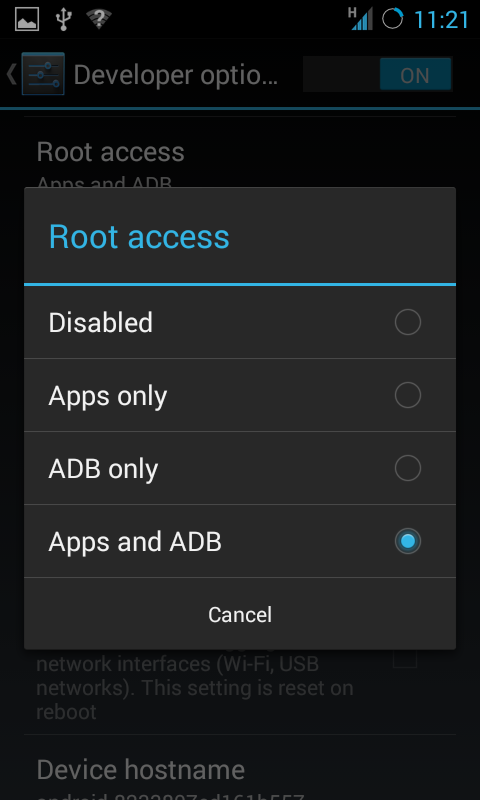
You need to also be able to give root access via adb in order to perform a full backup (that is my assumption). This is done by selecting ADB only or Apps and ADB in the Root access option under Developer Options (see screenshot).
Now plug your phone to your computer, your phone should ask for a USB debugging authorisation from the connected computer. You should authorise that.
You have now your phone ready to receive commands from your computer using adb.
Backup the phone using adb
The instructions in this section will be given for Unix/Linux/OS X. They work the same way for Windows, but the file path names will be different (e.g. ‘\’ instead of ‘/’, and so on). I am not going to give here Windows instruction. I assume that if you were able to install CyanogenMod on your phone, you can “translate” the below instruction for your platform. If you need assistance on Windows, you can use this excellent answer by Ryan Conrad.
Under Unix/Linux/OS X simply open up a Terminal. And go to where adb was installed. I assume below that you unpack ADT in your Desktop folder:
cd ~/Desktop/adt-bundle*/sdk/platform-tools
Now run the following command which will create a backup in your Desktop folder. This backup will include all applications and their data, all shared data (e.g. sdcard content) and full system backup.
./adb backup -apk -shared -all -f ~/Desktop/$(date +%F)-android-backup.abkp
Once you typed in this command, your device will ask you to confirm the operation and provide a password to encrypt the backup. I have used the same password as for the phone encryption, but I guess any password should work. Carefully remember the password because you will need it when restoring.
After you authorised the backup, it will take a while before it is completed (it took about 20 minutes for me).
Sadly, and this is a risk you will have to take, I know of no way to test the generated backup. After the completion of the above procedure, I simply checked the size of the file and verified that it could reasonably (even with some compression) contains my phone data. If you know better, let me know and I will update this section.
Reset to factory
Now come the part where you take some risk. In order to revert the encryption on the phone, we need to reset it to factory settings, which includes wiping out all your data. If the previous backup did not work or if your backup gets corrupted, your data might be lost once this step is performed. It is a good time to make a copy of the generated backup somewhere safe in case something goes wrong.

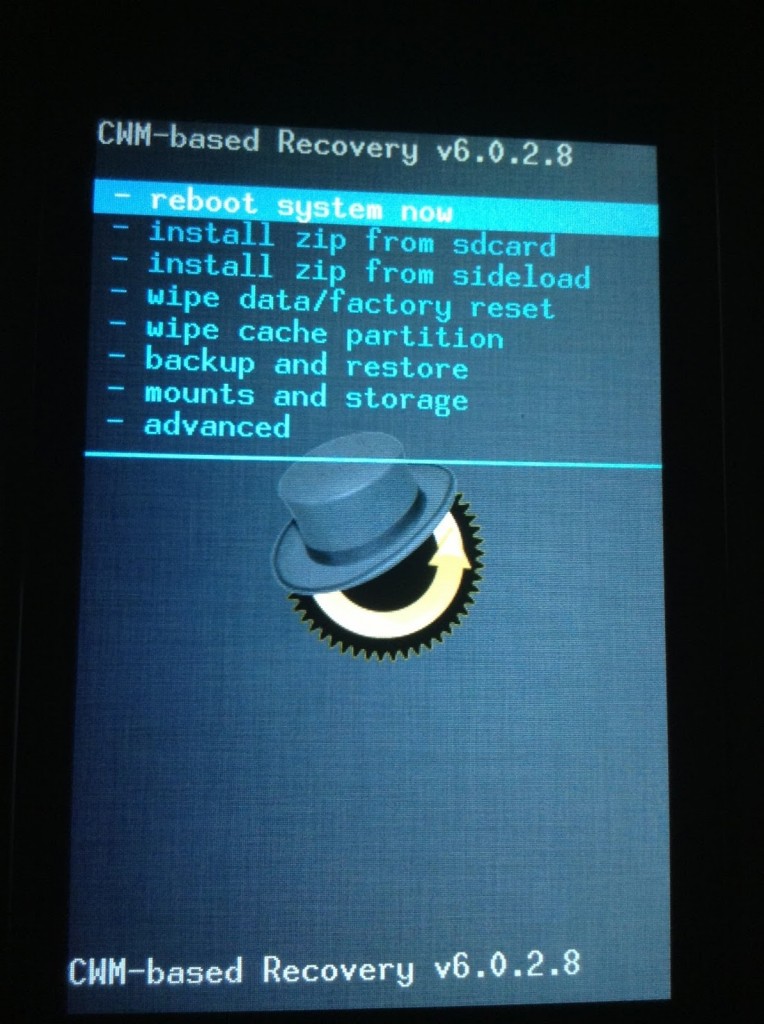
First unplug your phone’s USB cable from the computer (this is optional I believe, but I think it is safer) and shutdown the phone. Once switched off, start your phone in recovery mode (e.g. on Galaxy S this is Volume Up + Home + Power). I assume you know how to use the recovery menu, without which you could not have installed your CyanogenMod version. But as a quick reminder, Volume Up/Down correspond to Arrow Up/Down and the Home button corresponds to Select.
Once in recovery mode, select the item wipe data/factory reset and proceed. This will delete all data on your phone, you have been warned. You will be asked to confirm and you should do so.
You have now a non encrypted phone freshly cleaned. We will need to restore your data. So please reboot the phone by selecting reboot system now.
Restore your data
After the reboot (it can take awhile, like a couple of minutes), you will be prompt to connect to your CyanogenMod and Google accounts. I do not have the former but do use the latter. So I skip the first step (which was registering the CM account) but proceeded with setting up my Google account.
Note: I am using Google 2-step verification and I did not remember my application password that I set-up for my Android phone. So I went to Google’s Account Security Settings on my computer and generated a new application password and revoking the previous one.
During the setup of my Google account I explicitly asked Google to restore my phone (I did use the phone built-in Google backup). After the setup, I waited that Google’s restore was over. Not much is restored by this feature, so I guess it is possible to skip this step, YMMV.
Now it is time to restore the full backup. You will need to reactivate the adb daemon, please refer to the above chapter. And once again the following instructions are given only for Unix/Linux/OS X and you will need a Terminal.
cd ~/Desktop/adt-bundle*/sdk/platform-tools
./adb restore ~/Desktop/$(date +%F)-android-backup.abkp

Note: if you were doing this late at night and have done the backup before midnight and are doing now the restore after midnight, you will need to remove “$(date +%F)” and replace it by yesterday’s date. 
The restoration process will prompt a confirmation on your phone and ask you to enter the same password you used when you created the backup. Hopefully you remember it and can proceed.
The restoration is quite slower than the backup, and after 20 minutes I went to bed. So I do not know how long it took exactly. The app Google Play crashed several time during the restoration which did not seem to affect the process.
Once the restoration was completed, I rebooted the phone just to be safe.
Clean-up
Do not yet delete the full backup on your computer, keep it for awhile just in case.
But you should definitively restore the Developer Options to their original settings:
- Root access: Apps only
- USB debugging: OFF (unticked)
And switch OFF the Developer Options all together. You can unplug your phone from your computer and delete ADT bundle from it too (though I would keep it as long as the full backup file).
What worked and What didn’t
With my own experience, everything was restored but some applications authentication, no was data loss. So the approached was a success IMHO.
Some applications lost the authentication, I simply either had to request sign-in and it auto-magically found the account information again (e.g. Firefox Sync) or to request sign-in and fill in my login and password again.
Regarding specifically Google’s 2-step verification and the Google’s Authenticator app, the configuration of this application was not restored, but via Google Account’s Security I was able to set it up again in no time, which has invalidated the previous configuration at the same time. So perfect restoration with this extra step.
Conclusion
My phone is now unecrypted, which is sad, but on the other hand I can use it again. It is now reasonably fast again that I can use applications and browse the web on the go. CyanogenMod 10.2 is a great update, the phone feels more responsive and as definitively more battery life (recharging it every 48h instead of every 36h).

